This year the guild I belong to, The Flying Needles Quilt Guild, is working through the theme “Quilting Around the World.” Each month a member has done a demo featuring a quilting technique from somewhere in the world. We’ve been to England with English Paper Piecing and Hawaii for their snowflake technique. We are also heading to Ireland, the Amish Country and South Africa/Africa.
This month I had the pleasure of doing the demo and I worked on the Sashiko quilting method from Japan. It took me a long time to learn to pronounce that properly. Sash – i (the i sounds like the i in the word it)- ko.

Sashiko means little stabs and it was a way for the commoners during the Edo period 1603-1867 to stitch their material together to make their warmer clothes and blankets.
It was an interesting technique to learn as the running stitch is not one of my stronger stitches to use. And my fingers took a beating through this technique.
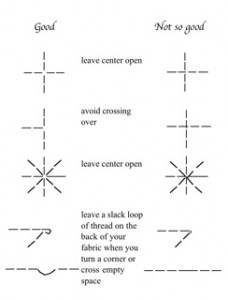
One of the most interesting things I learned was the “rules”, for lack of a better word, that the stitchers used.
Throughout the project pieces I did, I really tried to ensure I was following those rules because I wanted to be as authentic as I could be.
The first work I did was a pre screened/stamped design on a cotton fabric. It was by Sylvia Pippen Designs which I found on our trip to Maui. It is called Hawksbill Honu. Hawksbill is the kind of sea turtle and honu is the Hawaiian name for the green sea turtle.

What was nice about this pattern was it gave me the stitch lengths. From what I found of sashiko is that the stitch is longer and the space between is shorter.

Then I traced some of my designs using light weight interfacing and adhered it to the back and stitched it from back to front. This is where my hands took a beating. Originally, sashiko pieces were stitched on a looser weave of fabric. But I used a marble cotton with interfacing so it was difficult to get the thick 1.5″ needle through with a thick piece (4-6 strands) of floss through. But working from back to front was tricky. You stitched everything with the back facing you, but you had to keep in mind the “rules” on the front.

But for designs like these above, it was nicer to have a design you could trace rather than free hand draw.

I also tried creating a grid on the front of my fabric with a marking pencil and then was able to stitch the design. The darker pieces are an example of that.
Overall, I really liked the technique, even with the rules. Lately, I’ve seen a lot of magazines with sashiko designs with a more modern twist.


I have done very little of that type of stitching and yours is beautiful. I believe there’s a machine available that does this stitch exclusively. (Baby Lock???)
I heard that there was a machine on the market that could make that stitch. How amazing would that be, no more holes in my fingers 🙂
Your work is so pretty! I bet this is hard on your hands. How fun for your guild to be trying different techniques from around the world! Great idea 🙂
Thank you so much. Yep brutal on my hands, going to have to find the right thimble for this stitch for sure. It is a neat idea to see the different techniques from around the world. It has been interesting.
Well done they all look great. Your stitches are so neat
Thank you so much. Thanks for saying my stitches are neat.
This is beautiful! Lovely work!
Thank you so much. And for taking the time to comment. I appreciate it.
Hi Jen. I’m writing from Sew Sisters Quilt Shop in Toronto. Wanted to get in touch with you about a possible giveaway on your blog. Could you email me please so we can take the conversation further. Thanks!
I would be happy to email you. One is coming your way.