As I was saying, “Everything was going fine and dandy too. But then I came into some problems and things went from everything coming up roses to some sleepless nights – no I’m not joking.”
The trouble began when I had to switch over all the settings to free motion a quilt. On a computerized machine for free motion quilting I would lower my feed dogs, change to my quilting foot, change out my bobbin thread and make a slight adjustment for the thread tension. Sometimes, if I was superstitious I might even change the stitch length – not that it made a difference. On my Juki I had to do A LOT more, well it felt like a lot more at the time. For free motion quilting I have to lower the feed dogs, change the stitch length to zero, adjust the thread tension, adjust the presser foot regulator, and change the foot. Honestly, that was all a piece of cake. It quilts like a dream – though the speed was an adjustment because it can FLY!
You may be thinking, “Jen, where is the trouble you are speaking of?” Well, the trouble came when I had to GO BACK to the settings for piecing. I didn’t remember where any of the dials were set. When I raised my feed dogs, threaded the machine and went – like I did on my computerized machine – everything was consistent. This was a hot mess. My bobbin thread was all over the place, and my stitches looked like saw tooth. It became a game of adjustment. If I put the presser foot regulator in a certain spot, then I had to try to adjust the tread tension, then the bobbin tension, and then I would test sew. Gently wooing each component into their perfect spots – it felt like I was trying to get the planets to align.

This is just a sampling of all the swatches I sewed. Back and forth with adjustments to get my stitches straight – I even tried different combinations of thread. Oh I was so upset. SO UPSET. I lost sleep over it. One night I got up at 2:30 am and worked on it till 5:30 am. I am a bit (people who know me, know that it is WAY MORE THAN A BIT) stubborn and I didn’t want this thing to defeat me – ok pride got in the way too. Anyways, I spent time online to see if others were in the same boat, and I watched videos to see if I could get a glimpse of where people set their dials. I reached out to a couple of JUKI users to see if they had experiences the same trouble. An incredible lady responded back to me. Her name is Carla and she creates amazing items at Carla’s Creations. She was so kind to respond back to me about her experience with the machine and she even took pictures of her dials to give me a starting place. I cannot speak highly enough of her as she even emailed me later on to see how I was doing. What a gal! Her shop is on vacation at the moment as she is moving, but you should check out her stuff.
Thanks to her setting pictures, I was able to begin there and got my JUKI set back up where my stitches are soldiers in a row and there is no bobbin thread showing.
I took pictures of EVERY knob I have, just in case someone is ever in the same boat as I was and in case I need a refresher.


You are probably wondering how I feel about the machine after all of this. Well, during this ordeal I was quite upset at all this. In fact, I wondered if I had made a mistake. BUT, since I have it all sorted out and know how to make the adjustments and know my machine’s baseline, I am loving the results I am getting. And I enjoy working on the machine and look forward to using it.
With that being said, if you think you may like the JUKI, I have once piece of advice,
WRITE DOWN, OR BETTER YET, TAKE A PICTURE OF WHERE YOUR DIAL SETTINGS ARE.


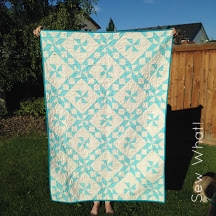
 I loved the look of the quilt and tried to pick my fabrics close to the ones she featured in her pattern. I however found some of the instruction to be more geared towards more experienced quilters, though a confident beginner could handle it but may need to read the instructions a few more times to understand the direction she is going. In the middle of the project I wasn’t loving where it was going in. Was it the colours, the pattern, or the way it was taking shape, I just couldn’t put my finger on it. In fact, it was inches away from joining my incomplete pile or be repurposed for something else, but in the end I stuck with it and was pleased where it finished.